COPY OR SAVE FOR SLIDES · EVERY PLAN · RESEARCH & EDUCATION
DICOM images into PowerPoint slides, with one copy and paste.
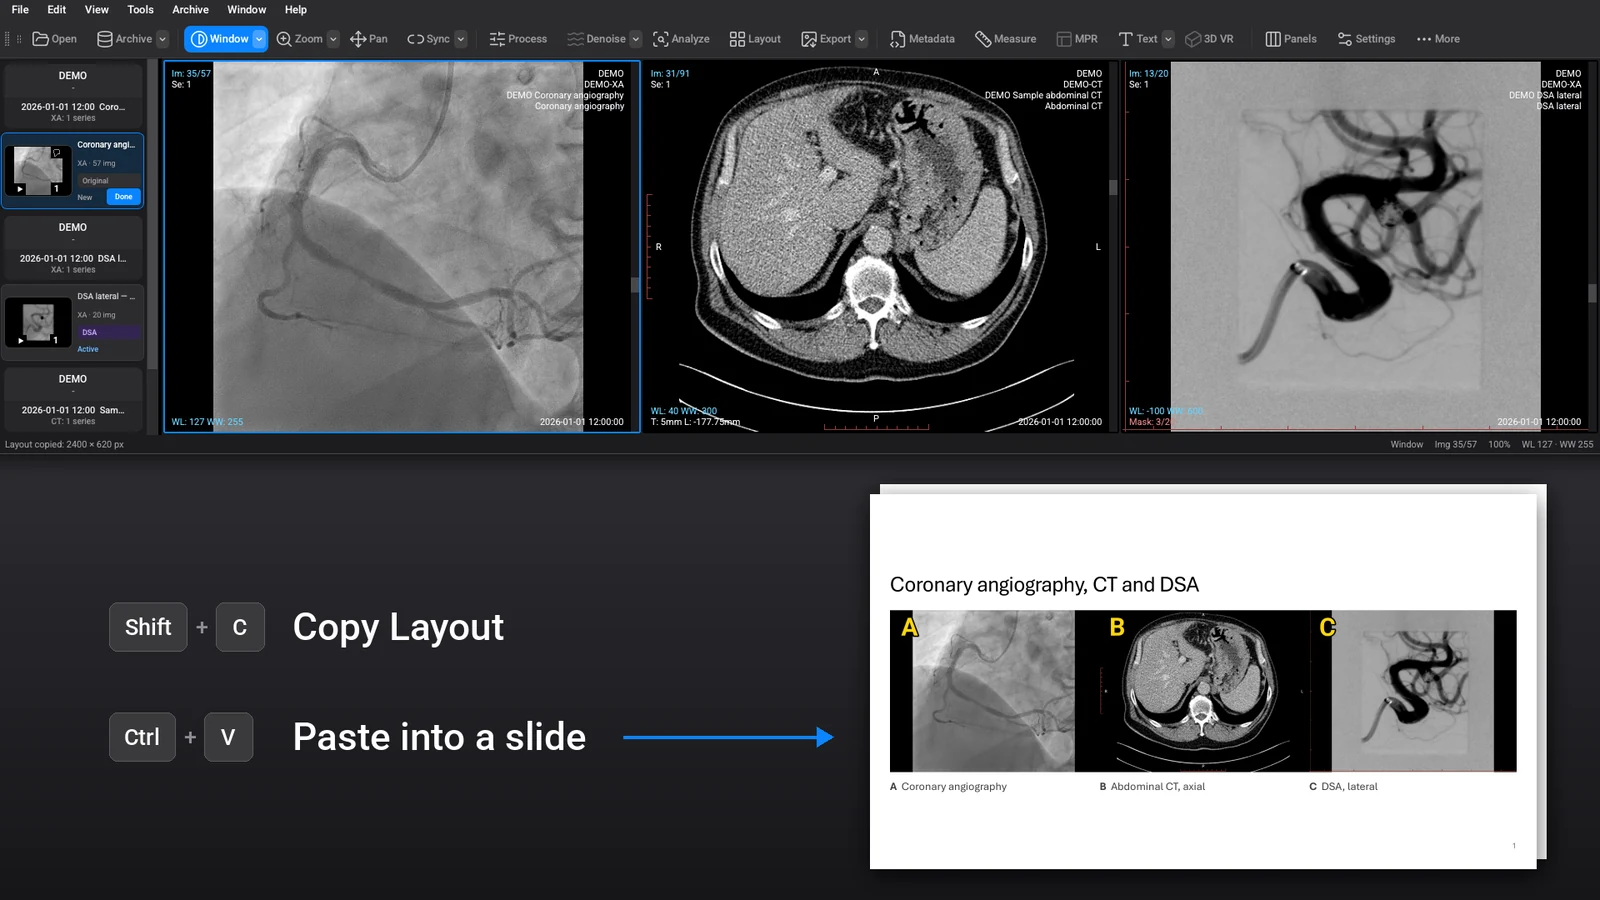
A .dcm file cannot go straight into PowerPoint slides: a DICOM image has to be drawn by a viewer, with its window and level applied, before it is a picture. OmniDICOM, a DICOM viewer for Mac and Windows, draws it and copies it for you. Copy Image puts the active panel on the clipboard; Copy Layout puts every visible panel there as one labelled picture, ready to paste into PowerPoint slides or any other app that accepts pictures. No screenshot to crop, no upload. To get a file instead, Save as PowerPoint (.pptx)… writes the slides in one step, with the measurements listed beside each picture.
Copying and saving slides work in every plan and in the 14-day trial; no card required. Trial and unlicensed copies and slides carry a watermark on a strip added below the picture, never over the image.
2400 or 3600 px
On the long side, drawn again for the copy, not grabbed from the screen
A, B, C…
Panel labels in any corner, in your style or your own words
No patient IDs
Left out of copies by default; a badge says when they are not
Based on OmniDICOM 1.1.6 · Application interface: English
Why a DICOM file cannot go straight into PowerPoint slides
A .dcm file holds the scanner’s pixel values, usually more shades of grey than a screen shows, together with tags that say how to display them. Presentation and photo apps read pictures, not DICOM, so the image first needs a viewer that applies a window (brightness and contrast) and draws it. That is why the usual answers are a screenshot or an online DICOM-to-PPT converter that asks you to upload the study.
A viewer that copies a properly drawn picture to the clipboard replaces both: the picture is made at a set resolution, with the labels a figure needs, and the study never leaves your computer.
How to copy DICOM images into PowerPoint slides
- Open the study and arrange the panels. Choose a layout with the Layout button, set the window, zoom and position in each panel, and add any arrows, measurements or text the slide needs.
- Copy one panel with Copy Image: Ctrl+C on Windows, ⌘C on a Mac, or right-click the panel and choose Copy Image. If a measurement is selected, the same key copies that measurement instead, so first click an empty part of the image or press Esc, or use right-click ▸ Copy Image, which always copies the image.
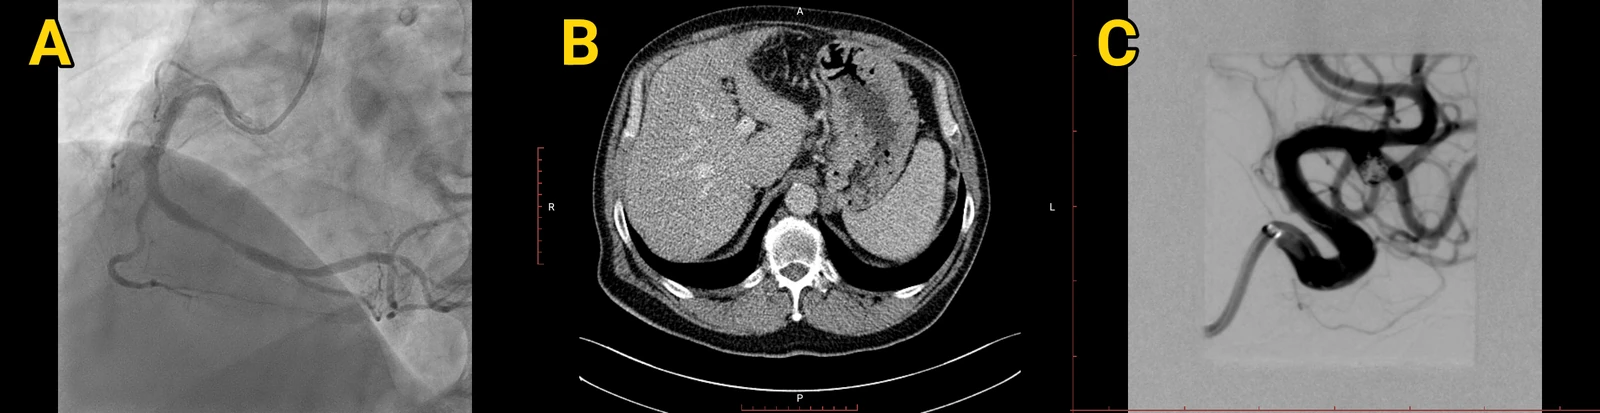
- Copy the whole layout with Copy Layout: Shift+C on both, or Edit ▸ Copy Layout, or the arrow next to the toolbar’s Export button ▸ Copy Layout. Every visible panel becomes one picture, each panel the same size and in the same place as on screen. The status bar confirms it, for example “Layout copied: 2400 × 620 px”.
- Paste it into the slide: click the PowerPoint slide and paste, Ctrl+V on Windows or ⌘V on a Mac. The copy arrives as a picture, to place and size like any other.
- Look at it before you share it: check the corner text, the labels and any text on the image itself.
Or save the slides as a file: Save as PowerPoint (.pptx)…
Save as PowerPoint (.pptx)… writes a .pptx file in one step. It is in the File menu, the toolbar’s Export menu and the image panel’s right-click menu. Choose where to save; the suggested name is “OmniDICOM slides” followed by the date and time. Every text box and table on the slides can be edited.
- One image on screen: one slide. Several panels: a first slide with the whole layout as one picture, then one slide per image, the active panel first.
- Each image slide: 16:9 on black, the picture on the left and, on the right, the series number and description, the modality and image number (“Image 34 of 120”), the window (“W 400 · L 40”) and a table of the measurements on that image, numbered as on screen when Number Marks is on. A long list shows the first 12, then “+N more”.
- Speaker notes: the series, image and window lines as text, with the plane and the calibration where they are known; the measurements are in the table.
- The same pictures and privacy as a copy: the pictures are the ones Copy Image and Copy Layout make, at the same size and with your Copy Options. The slide text and the file properties carry no patient name, ID, date or DICOM UID.
- Trial banner: during the trial or without a licence each picture carries the watermark strip below it, as a copied picture does.
Set what the copy holds: Copy Options
Copy Options…, in the Edit menu and under the arrow next to Export, sets what both copies hold, and the pictures of saved slides follow it too. Its preview is exactly what Shift+C copies, trial banner included, and your choices stay until you change them.
| Corner text | None, Image info or As on screen, or tick fields one by one. Image info: series description, image number, window, slice thickness and position, processing. A new installation copies image information and no patient identifiers. |
|---|---|
| Show panel labels | A letter or number in each panel of a Copy Layout picture, on by default. Copy Image never has one. |
| Style | A B C D, a b c d, 1 2 3 4, A) B), a) b), 1) 2), (A) (B), (a) (b), (1) (2), or Custom… with your own labels, such as “2A, 2B, 2C, 2D” or “i, ii, iii, iv”. |
| Position, size and colour | Any corner; 8 to 320 pixels at Slide size (96 by default); White, Black or Yellow with a thin outline, Bold on or off. Labels shrink only when a panel is too small for them. |
| Order | Across rows (A B / C D) or down columns (A C / B D). |
| Lines between panels | White (the default), Black or None. |
| Picture size | Slide, 2400 pixels on the long side (the default), or Large, 3600 pixels. |
What a copy keeps and leaves out
- Kept: the image as shown, with its window, zoom, rotation and flips, filters, Denoise, DSA and fusion with its colour bar; measurements, arrows and their numbers, typed text, the rulers and the orientation letters.
- Left out: the cursor readout, the crosshair, cross-reference lines, selection handles, scrollbars and the series comment. (MPR window copies keep the crosshair as shown.)
- A copy never shows more than the screen: with annotations off (F12) it has no corner text.
Keep patient data off your slides
- A new installation copies image information but no patient name, ID, birth date, hospital or study date.
- While a copy would include identifiers, an orange status-bar badge says so, for example “Copies include: Name, ID”; click it to open Copy Options.
- Hide Patient Data (Shift+F12) always leaves identifiers out, and series comments are never copied.
- Text burned into the pixels, such as a name on a screen capture or an ultrasound image, is part of the image and is copied with it. To share whole studies, make a de-identified copy first.
From the MPR and 3D windows, and for many slices or a moving run
- MPR window: Ctrl+C (⌘C on a Mac) copies the active viewport and Shift+C copies all viewports, with panel labels when they are on; what each viewport shows, crosshair included, is copied as on screen. 3D window: Ctrl+C (⌘C) copies the rendering. These follow Copy Options too.
- Many slices at once: export them as PNG or JPEG files and insert them as pictures.
- A moving run on a slide: a copy is a still picture. Export a cine run, or a series to scroll through, as an MP4 movie and insert it as a video: it plays on the slide, it does not scroll like the viewer.
- Numbers to go with the figure: Number Marks numbers arrows and measurements 1, 2, 3 for each patient, so the slide can refer to “Mark 2”; in Professional, Analyze tables save as Excel workbooks or CSV.
What you need
- Any plan, or the 14-day trial. Copying and saving slides are in every plan. Copies and slides made during the trial or without a licence carry a watermark on a strip added below the picture; Basic and Professional ones carry none. After the trial, studies keep opening in five-minute sessions until you choose a plan.
- Mac: Apple silicon and macOS 13 or later. Windows: 64-bit Windows 10 or 11. The same menus and the same pictures on both. Copy Layout is Shift+C on both; where Windows uses Ctrl (Copy Image, the MPR and 3D copies, paste), a Mac uses ⌘.
- A program to paste into: PowerPoint slides, or any other app that accepts a pasted picture.
Common questions
Do I need to convert DICOM to PPT or PPTX?
No. Copying needs no file: OmniDICOM draws the image, Copy Image or Copy Layout puts it on the clipboard as a picture, and you paste that picture into your PowerPoint slides. If you want a file, Save as PowerPoint (.pptx)… writes a .pptx directly, one slide per image with its series, window and measurements beside the picture. Nothing is uploaded either way. For many slices of a series at once, export PNG or JPEG files and insert them as pictures.
What resolution is the copied picture?
2400 pixels on its long side with the Slide size, the default, or 3600 pixels with Large. Each panel is drawn again at that size instead of being captured from the screen, so a copy comes out the same on a Retina Mac, a laptop or a large monitor.
Does it work the same on Mac and Windows?
Yes. The menus, the options and the pictures are the same. Copy Layout is Shift+C on both; Copy Image is ⌘C on a Mac and Ctrl+C on Windows, and you paste with ⌘V or Ctrl+V.
Can I label the panels 1, 2, 3 or with my own labels?
Yes. In Copy Options, Style offers A B C D, a b c d, 1 2 3 4 and bracketed forms such as (A) (B), and Custom… takes your own labels separated by commas, such as 2A, 2B, 2C, 2D. You also choose the corner, size and colour.
Are patient names copied onto the slide?
Not by default. A new installation copies image information only. If you tick patient fields in Copy Options, an orange status-bar badge says the copies include them, and Hide Patient Data (Shift+F12) always leaves them out. Text burned into the pixels is part of the image, so check it.
Can I paste a stack of slices that scrolls?
No. A copy is a still picture. To show motion or a pass through the slices, export the series as an MP4 movie and insert it as a video; it plays on the slide but does not scroll like the viewer.
Do measurements and arrows come along?
Yes. Measurements, arrows, typed text, rulers and orientation letters are copied as shown, and with Number Marks on, arrows and measurements carry their numbers. The cursor readout, crosshair and cross-reference lines are left out; only MPR window copies keep the crosshair as shown.
Can I paste the copy somewhere other than PowerPoint slides?
The copy is an ordinary picture on the clipboard, so any app that accepts a pasted picture can take it.
Is there a watermark?
Only on copies and saved slides made during the trial or without a licence, and then on a strip added below the picture, never over the image. Copies and slides made with Basic or Professional have none.
PUT YOUR OWN STUDY ON A SLIDE
Try Copy Layout for 14 days.
The download needs no card. The 14-day Professional trial starts on first launch with an internet connection, and copying works in it and in every plan. Copies made during the trial or without a licence carry a watermark on a strip below the picture; with Basic, US$10 a month per computer, or Professional they carry none.
OmniDICOM runs on Mac and Windows computers. Open this page on your computer to download it. Meanwhile, read the how-to guides or watch OmniDICOM at work on YouTube.
macOS 13+ · Apple silicon · signed, notarized PKG
Windows 10/11 · 64-bit · signed EXE
More ways to get images out
Image credits
The pictures are the OmniDICOM app’s own: a capture of the app and the exact picture its Copy Layout made, placed on a slide; the keys and their labels are drawn in. The angiography runs are OmniDICOM’s own demonstration runs, with demo names, IDs and dates. The CT is LDCT-and-Projection-data: McCollough C, et al. (2020), The Cancer Imaging Archive, doi:10.7937/9npb-2637, CC BY 4.0, modified; NIBIB grants EB017095 and EB017185.